
 Welcome, Blog Hoppers! The CardMonkey is proud to participate in Crafty Card Gallery's New Year's Thank You Cards blog hop.
 During this long weekend (ahhhhhh!), I will try to post as many thank you cards as I can make while hopping along with you. Check back as often as you'd like, as I'll add more cards/ideas. And don't forget to read on, as there will be several opportunities for blog candy added every day! Who doesn't love candy!?
Day 1, Card 1: "You made my day" flower, shown at top: For this card, I first computer-generated the circle-centered text "Thank you so much", and printed the sentiment on white cardstock. At the same time (and lower on the paper), I also printed the curved sentiment "You made my day." Both of the sentiments are easy to set in curves or circles using the Adobe Illustrator software.
I then cut a large white flower using the centerpoint feature on my favorite Cricut Cartridge, "Cake Basics". I inked the edges of the flower in a pretty blue-gray ink in my stash.
Silly sidenote: I got the "Cake Basics" cartridge in my Cricut Cake bundle in August. To be honest, I haven't yet used the pretty red Cricut Cake at all -- I don't have the time! -- but I use the cartridge alllllll the time. Good, basic shapes! Do you have Cricut Cake and have you tried it for anything other than cake decorating? Please let me know!
I cut a second flower in the accent color (blue-gray), bumping up the size by 1/4" to work as a shadow. I rubbed each flower with a stylus, on a foam pad, to soften the cardstock -- then curled the petals using a reverse tweezer. The flower leaves are fussy-cut from ribbon.
The brad was made using polka dot paper and my Imaginisce "I-Top" brad maker. Stitch-punching was done at the lower left and lower right corners of the card, using my sewing machine without thread. (Yes, I know I could just use a pin, too -- but this is easier when the machine's already up. The spacing is already figured out for you!)
 OK, Blog Hoppers: Here is CANDY #1. Your "candy" is a set of a dozen handmade brads made by CardMonkey herself! The brads will be appropriate to use on your Valentine's Day cards, as well as your Easter/spring cards. To win:
1. Post a comment to this post. Indicate that you'd like to win Candy #1, and provide me with some e-mail way of contacting you when your name is randomly selected. For an extra chance to win Candy #1, become a follower here, OR let me know you already are a follower.
Scroll down and look for the KISS for MORE CANDY to win! It's the Grand 2010 CardMonkey giveaway!!
_________________________________________________
 Update -- 10:30 a.m. - 12/31/10 -- Already, another card!!
_________________________________________________
 Update -- 10:30 a.m. - 12/31/10 -- Already, another card!!
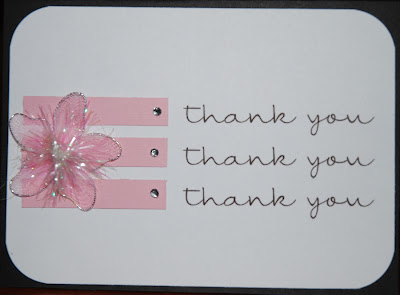
Day 1, Card #2: This is a rather simple but elegant thank you card. On white cardstock, I created and repeated the sentiment using a computer-generated font and printer. Then, using some pink paper scraps cut to the same length/width, I highlighted the sentiments. Adorned each strip with a small rhinestone and for extra zing, affixed a cute Creative Charms flower. I rounded the corners and glued the whole piece onto a pre-made black card with a white interior. Yup ... it took about 10 minutes, tops. Simple and sweet!
 More Blog Candy! For a comment mentioning Blog Candy #2, you can win a chance to receive an embellishment grab-bag. Guaranteed it will have some brads, stickers, rhinestones and pearls ... a little of this, a little of that. If you've already commented looking to win Blog Candy #1, go ahead and post again for Blog Candy #2 ... let me know what you think of Card #2 and that you'd also like to earn a chance at this Candy!
 And yes, MENTION that you're a follower -- or become a new one -- for an additional chance to win the candy!
And ladies (and any gent followers) ... Here's the big news! For each card/candy you comment upon, you'll receive one entry into the CardMonkey Cricut Cozy giveaway at the end of the Blog Hop!! That's right -- a custom-made cozy cover just for you.
___________________________________________
 Day 1, Card #3
 11:45 p.m.
Frame with Flowers
There's not much time left before the ball drops in Times Square, signaling the end of 2010 and the start of what I hope will be a fabulous year. It's 11:45 p.m. here on the East Coast, and I'm just getting around to making and posting another card for the Spectacular New Year's Thank You Cards Blog Hop.
And yes, there's MORE CANDY so don't forget to post a new comment if you'd like another entry to win this candy that comes along...
For Card #3, I cut a frame from a shimmer lavendar paper. Quite honestly, this cut was in my scrap box that I came across while cleaning my Craft Loft -- I think it was an off-cut, where I used the inside for something else along the way. On white cardstock, I printed the sentiment using a computer-generated free font (how pretty!).
To the side of the frame, I added a rose, a daisy and an amaranth. What's an amaranth, you ask? "An imaginary flower said never to fade." In other words, one I conjured up just because. The flowers were made using Punch A Bunch paper punches.
I colored the rose's petals using Copic markers and a blending marker; the yellow in the daisy is Flower Soft. Did you know that Flower Soft is made from ground-up PVC pipes?? There ya go!
Feeling the card still needed a little "more", I colored some pearls (using Copics) green and fixed them to the points of the frame. I think it's a pretty card, do you?
 Candy #3 -- Here it is, I'm offering up some handmade flowers ... some like these, and some other kinds I've made too. There will be at least a dozen, maybe more ... definitely worth your while!
To win, post a comment about Card #3, and indicate you'd like to be entered in the drawing for Blog Candy #3. Don't worry if you've already entered for Blog Candy #1 or #2, you're still eligible for this Candy too.
And you'll get an automatic entry into the Grand Prize (Cozy Cover, below). If you become a follower or are already a follower, please say so in your comment for an extra entry! Whooo-eeee, don't worry, I'm keeping a spreadsheet for your entries!! Are we having fun yet!? I am!
__________________________________________________
Here's the news about the GRAND PRIZE, celebrating the end of 2010 and beginning of 2011!

Spectacular Update, Day 1 ...

Spectacular Update, Day 1 ...
Not a card, but a THANK YOU!
And a product of the CardMonkey Craft Loft:
Here it is, the infamous Custom Cricut Cozy that will be made for the GRAND PRIZE Blog Candy winner to say THANK YOU for visiting my site and offering encouragement.
This cozy, shown above at right, was finally made for GiGi, winner of my last Blog Hop candy. GiGi agreed to patiently wait until after Christmas even though I'm sure her Bug has gotten mighty cold up there in Wisconsin! She asked for a white with light blue accents, embroidered with The Cricut Bug and this is what I came up with. What do you think?
ALL blog hoppers who post any comment on the CardMonkey's Thank You cards will be entered into the Grand Prize drawing for a Custom Cricut Cozy in your own colors and wording. (Design by CardMonkey)
Comment once please on each card; each comment will get you an entry. You may comment on the Cozy Cover for another entry! If you are a follower or become a follower, please let me know in your post and you'll automatically get another entry. Drawings (for each of the candy, and the grand prize winner) will be at random, on Monday evening.
GiGi and Tracy (another winner from a previous candy offering), your Cozy Covers went out in today's mail. Apologies for the delays in getting to the mailbox. If it's not one thing (new day job), it's another (new granddaughter), another (snow!), another (Christmas!!), etc. Look for them soon!
_________________________________________
Check back later this weekend, as I hope to add EVEN MORE candy and more cards along the hop. More chances to win, more prizes for the New Year, YAY!
OK, now hop on back to the New Year's THANK YOU CARDS Blog Hop. On your next stop, you'll be visiting Miss Adri's fabulous blog at Ma Cherie Creations. (Click the name to hop on over!)
OK, now hop on back to the New Year's THANK YOU CARDS Blog Hop. On your next stop, you'll be visiting Miss Adri's fabulous blog at Ma Cherie Creations. (Click the name to hop on over!)
If you get lost along the way, the entire list of hop sites is posted at the start, Crafty Cards Gallery. Thank you for joining us this weekend -- and be sure to stop back for additional chances to win more prizes from the CardMonkey!


