Friday, June 27, 2014

Dazzling New Grandson -- along with special TBB sale to celebrate!

 
The world's a lot brighter now, with the birth of a new star:  My grandson, Evan Joshua Cohick, was born yesterday, June 26, 2014 at 12:08 p.m.  

He's all of 8 lbs., 13 oz, and 22" long.  Mother Emily and Baby are doing well, as are Evan's Dad, Josh, and Evan's big sister, Charlotte.


Gii and Pot are over the moon!


No doubt to celebrate (and this IS my day to post about this product), The Buckle Boutique is offering a very special sale on its baby blue twinkles ... Rhinestone resin sticker sheets in ice blue and blue bonnet, shown below.  Click HERE to learn more about them, and the sale price of these beautiful gems.

Friday, June 20, 2014

Disney Pixar Blog Hop, Redux - June 21

Welcome to the
Disney Pixar Blog Hop!

If you love Disney Pixar and crafting, you've come to the right place!  We have an entire month of fun planned for you, with a new group of crafting bloggers every Saturday in June.
If you came here from Cathie's's blog, then you are in the right place.  If you just happened upon this Blog Hop, make sure to head over to Shawn's blog so that you see the full hop from the very beginning.  If you missed the first two weekends, you can still go back and see all of those projects too.  Just click HERE to see the projects from the first weekend, and click HERE to see the projects from the second weekend.

Here is my project for this weekend's hop: 

I created one of the very popular, current "box cards".  This gem folds flat for mailing, and opens up to show a Disney birthday party!

I used a 6" x 11.5" template to make the card base. The cute plaid paper was from a very large box of Disney stash papers I've accumulated over the years, as is the black matte paper with silver stars shown on the edge.  The characters shown (Minnie and Donald) along with the stars are chipboard elements I purchased at Michael's.  The "eat cake" element is from Jillibean Soup. And I cut the silver "Happy Birthday" using my Silhouette Cameo with a Silhouette file.

The very special elements I used here came from two of our sponsors: The Buckle Boutique and Rowlux Illusion film. From TBB, I used clear Dazzling Diamonds resin rhinestone cut in strips two rows high and adhered to the flip panels. I used the Illusion film (clear bubble) to cut the balloons and I colored them with Copic markers.  YES, coloring/tinting works great!!!
So now, let me move you back on through the fantastic Disney Hop.  But, before you go, make sure to sign up to win some AMAZING PRIZES from our sponsors!  Our sponsors for this hop include:


To play along and be eligible to win these prizes, go here:

a Rafflecopter giveaway
(Winners must live in the Continental United States, due to shipping restrictions.)

Make sure to mark your calendar for MORE projects next Saturday!  You can join the Facebook Event page by clicking HERE.  This week, I am the last stop on this fantastic hop.
Be sure to come back to visit the Disney Pixar Blog Hop EVERY Saturday in June. Each day's starts with Shawn Mosch; she will post a list of each week's participants on each Saturday. 

Here is the full line up in case you get lost along the way:

Tami (Sorry Disney fans . . . post is not up . . . please skip for now)
Cathie (Sorry Disney fans . . . post is not up . . . please skip for now)

Have yourself a fantastimagical day!


DeFiaNtLy DiFfeReNt & CreAtiVeLy Yours,

Friday, June 13, 2014

TBB Friday: Blinging out the Bride or Prom Queen

June ... so often we think of brides, proms, graduations, and other special events. And when I think of special events especially for the girls in my life, I think of bling from The Buckle Boutique.  Of course!

Welcome!  It's time again for my TBB Friday ... time to share just a few of the wonderful things I've made with the ingenious products of The Buckle Boutique.

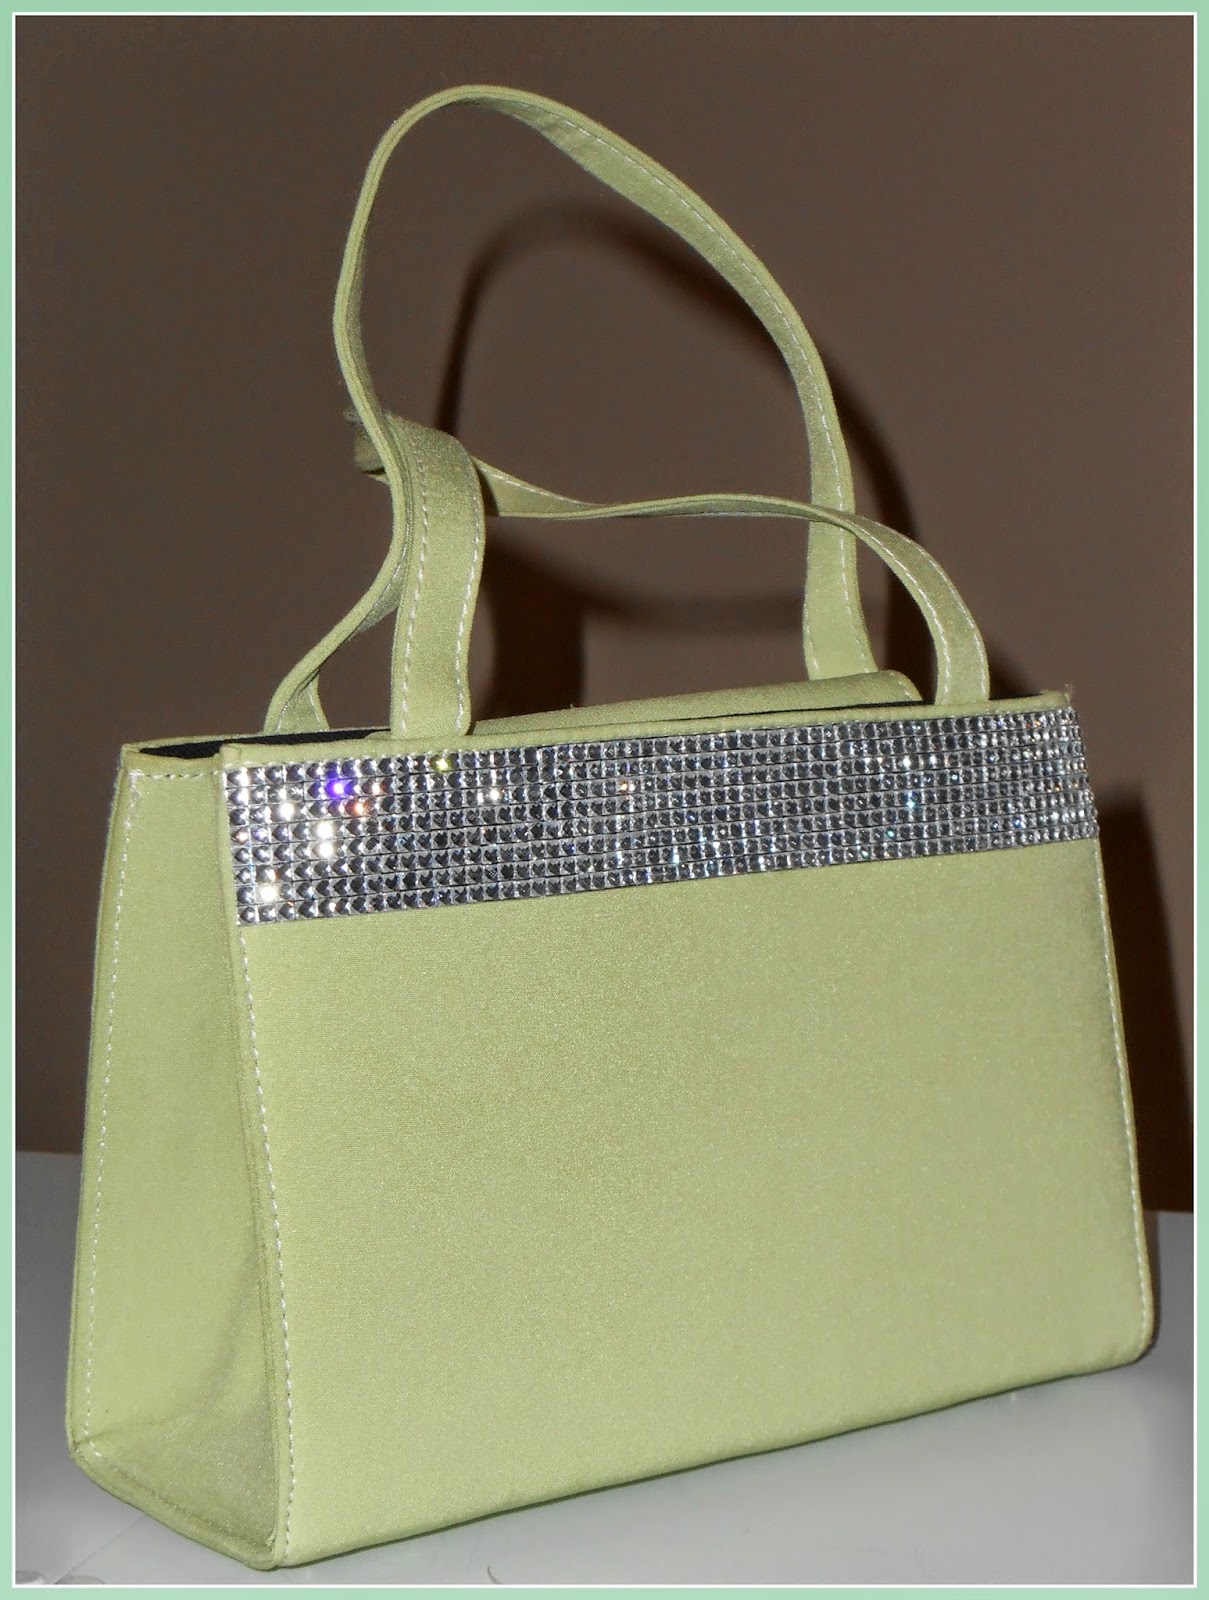
First up, let me show you how a cute celery-colored Kate Spade bag became extra special with a strip of self-adhesive rhinestone resins.


These "Dazzling Diamonds" are clear.  Using standard scissors, I trimmed a strip approximately 1.5" wide for each of the two top edges of this handbag that I found for a "song" at my local thrift store.

First, I wiped down the handbag to be sure it was clean and dust-free. After measuring and cutting the strip from the sheet, I peeled away the backing from the adhesive in the back of the cut sheet and adhered it to the top edges. I gently rubbed and voila! A purse fit for a Prom Queen!

While I was dressing the "Queen," I also made this headband by adhering a row of sequined gems from my Buckle Boutique stash to a headband frame I got at Michael's.

Now this particular gem strip has been discontinued -- but you should visit TBB's website regularly to see what unique bling they are carrying to see how to make your event even more special.

For example, take a look at this gorgeous bridal wrap that I found on their website (www.thebuckleboutique.com)!

Looking for more blingedness inspiration?  Take a look around Pinterest (www.pinterest.com) ... just search for "bling" items.  For the prom goer or the wedding participant or bride, there are luscious things like blinged-out flip-flops, sneakers, sandals, perfume bottles, tote bags and even flasks like this:


With bling from The Buckle Boutique, the starry-sky is the limit of your imagination!  


The Buckle Boutique’s Link Listing
The Buckle Boutique’s Website . . . click HERE
The Buckle Boutique Blog . . . . click HERE
Facebook Page . . . click HERE
Twitter Page . . . click HERE
Pinterest Page . . . click HERE


DeFiaNtLy DiFfeReNt & CreAtiVeLy Yours,

Sunday, June 8, 2014

Crafting with "My" Charlotte


It's hard to believe this picture of Charlotte was taken
almost exactly a year ago, when she was 2.5 y/o. 
Of course, I only scrapped it recently!  :)
I have a new crafting buddy in The Paper Jungle -- granddaughter Charlotte has taken quite a shine to spending time "making things" in what she calls the "Art Project Room." 

She especially enjoys learning the Cricut Explore.

Yes, if SHE can do it, so can you -- she's only three! 

When she comes to play every week, she decides what animal she's making, whether it's a yellow giraffe, a blue-polka dotted rhino, a lion with a hot-pink mane, or a red flying bird. Then she selects her Cricut cuts, pats the paper on the mat, and pushes the "blinky lights."  Her tiny fingers and fingernails work great to peel the cuts off the mat. Then she cuts objects using her round-tipped scissors and the off-cuts from the colored paper the Cricut has cut. And then she makes a card.

It takes a hard swallow and an open mind to let a three-year old into my inner sanctuary. It must be love!  I've come upstairs to straighten up last night's "party" here with "Gii and Me."

Here is the card Charlotte made to welcome her baby brother, Evan (coming soon!):


Here is her crafting aftermath. Not bad -- could be worse!


She works from her "Art Project Box" that she put together from "shopping" from Gii's craft drawers. Her favorite thing in the "whole world" is Washi tape.


It's only paper. The joy she (AND *I*) gets from the time we spend together is worth the whole lot of paper from which she can choose here. 


Have you crafted with your kiddies today?  I miss "my" Charlotte already!  Until the next time, baby girl...


DeFiaNtLy DiFfeReNt & CreAtiVeLy Yours,

Saturday, June 7, 2014

Disney Pixar Blog Hop - C'mon along!

Welcome to the
Disney Pixar Blog Hop!

If you love Disney Pixar and crafting, you've come to the right place!  We have an entire month of fun planned for you, with a new group of crafting bloggers every Saturday in June.

If you came here from Jenny's blog, then you are in the right place.  If you just happened upon this Blog Hop, make sure to head over to Shawn's blog so that you see the full hop from the very beginning.

Here is my Very Special Project I made for my granddaughter, Charlotte, who is over-the-moon enthusiastic (like most kids!) about Disney's newest release, "Frozen". 
 
I made Charlotte this Anna & Elsa necklace:


To make this necklace, I used Close To My Heart's new line of wearable art, including the pendant, glass dome and chain. 
 
Here is a link to the CTMH Base & Bling Wearable Crafts page:
 
 
I printed out a cropped image from an advertisement for the movie, onto photo sticker paper. Once the art was adhered to the pendant base, I smoothed a layer of Liquid Glass onto the back of the glass dome and adhered the dome to the photograph. To the back of the pendant, I applied "ice cubes" (as Charlotte calls them) -- a one-inch square clipped piece of adhesive rhinestone resin from The Buckle Boutique.


Now that we have front row/center seats for the upcoming "Disney on Ice - Frozen" show, playing after Christmas in Philadelphia, and Charlotte has her Elsa dress, I'll have to make a few more "Frozen" charms for Charlotte's necklace. 
 
So now, let me move you back on through the fantastic Disney Hop.  But, before you go, make sure to sign up to win some AMAZING PRIZES from our sponsors!  Our sponsors for this hop include:


To sign up, follow the instructions on this Rafflecopter:

Make sure to mark your calendar for MORE Disney projects next Saturday!  You can join the Facebook Event page by clicking HERE.  

Updated:

I've gotten many requests on information on how to make your own charm(s) for the special children in your life.  Here's what I used, and links on where to purchase the supplies:

First, I Googled the image and cropped one I liked from an advertisement to 1" square, using PicMonkey (shown at right). Bear in mind that using any image you find this way is still subject to copyright protections, including what can be considered "fair use" and "for personal use."  

Print and trim the image to 1" square. I used photo paper to protect the image's colors from running under the glue.

Your shopping list should include:


Pendant frames:  Style #Z1962 (Faux Silver), $4.95 for 3


Pendant glass domes: Style #Z1967 (Square), $1.95 for 3


Liquid glass adhesive: Style #Z679, $6.95


Optional:
Matching Faux Silver Chain, 30" , Style #Z1940, $5.95 each


To make the charm:  Trim the image to 1" square. Place a small (3/8") dot of Liquid Glass to the flat side of one square glass dome. Smooth the Liquid Glass over the entire FLAT surface of the glass piece, taking care not to get any bubbles in the glue. This should be a thin, smooth coating.

Carefully line up the glued flat surface over the printed Anna & Elsa image, and then place the glass piece of the image straight down -- without rocking, sliding or otherwise smudging the glass over the image, to prevent the ink from transferring and smearing. Set aside and let dry.  After the charm is dry (about 40 minutes), trim any excess paper off of the image so that there is none hanging over the edge of the glass piece.

Now put a generous 1/2" dot of Liquid Glass into the recessed area of the charm. Center the image/glass piece over the glue, so that Anna and Elsa are right-side-up, under the bezel of the charm. Push the glass piece onto the glue with a firm hand-grip. If any Liquid Glass oozes out, be sure to wipe the top of the glass cover clean, using a baby wipe, before the Liquid Glass dries.  The charm will be dry and ready-to-wear in about 30 minutes.


Now it's time for you to head over to Tami's blog.

The full hop line up for this week is below in case you get lost along the way. . .


Be sure to come back to visit the Disney Pixar Blog Hop EVERY Saturday in June. Each day's starts with Shawn Mosch; she will post a list of each week's participants on each Saturday.  (I'll be back on June 21 with another super Disney project!) 
 
Have yourself a fantastimagical day!
 
 
DeFiaNtLy DiFfeReNt & CreAtiVeLy Yours,

Tuesday, June 3, 2014

#PaperTrail Update! Beautiful visit to Kathy Davis Studios


Eileen's Scotty and "Big Daddy" (truck pulling Scotty) pulled up shortly before 9 a.m. this morning for a brief visit to the Paper Jungle to freshen up.  We headed off to Kathy Davis Studios ... and found ourselves walking into a staff celebration, honoring a Studio Artist's birthday, al fresco in the beautiful sunshine. Kathy was warm and gracious, as ever, and gave us an intro tour. She sat and chatted comfortably with us -- she is the consummate host! 


The KDS' Executive Director Lorraine -- who has known Kathy since they were 15 (a few years ago) and has been with Kathy as her organizational maven since the company's start.  Lorraine gave us a comprehensive tour of the extensive operations at KDS, including this impressive temperature-controlled library of every card ever made by KDS. Here is Kathy and Eileen in that area:


We truly appreciated the friendly reception by Kathy, Bill, Lorraine and Linda, and all the staff at KDS, as well as the gift bag full of Kathy's beautiful cards and autographed copies of her newest book, "From a Mother's Heart."


Next up, Eileen will be teaching a class on using embossing folders and dies!  More later or tomorrow!


DeFiaNtLy DiFfeReNt & CreAtiVeLy Yours,

The #PaperTrail starts here at the Paper Jungle

Today is the day! 

CardMonkey is pleased to be the first stop on Sizzix Designer Eileen Hull's PaperTrail. 

What's it all about?  Pulling a vintage (1976 -- I guess that makes me "vintage" too, because I was in college then) Serro Scotty trailer stuffed with crafty goodness, Eileen is traveling to 20 stops (so far) in the month of June, demo'ing and teaching craft techniques.

At right, here's one of Eileen's photos taken yesterday, as she was loading "Scotty" to ready for her month-long journey to teach crafting ...

Our plans for today start with a visit to introduce Eileen to Kathy Davis (www.kathydavis.com) and have her tour the inspiring Kathy Davis Studios (KDS) in Horsham, PA.  


Source: www.kathydavis.com
Kathy has been an inspiration to me long before I first met her last summer. Her poignant messages on her greeting cards along with vibrant and heartwarming art fill my spirit. The funny thing is, until last year, I never realized that Kathy and her team at KDS are practically in my backyard. 


KDS Gallery, in Horsham - Open to the public. Source: www.kathydavis.com
How it happened is serendipity: I signed up to be a paper-crafting instructor at the new JoAnn Store in Warrington, where JA Corporate decided what crafts those local to me wanted to learn. Frankly, it wasn't working, and I blogged about wanting to work with KDS papers, which were then carried exclusively at JA. 


Kathy found me through Facebook, and had her friend and VP Bill Lessa hunt me down -- to tell me that I certainly could teach papercrafting at KDS, and so our journey and friendship began.

I'm happy to share that with Eileen, who I also met rather serendipitously through Facebook!  And now, Eileen is on her way here!


Source: https://www.facebook.com/eileenhulldesigns
After touring KDS, the plan is for Eileen to stop back at the Paper Jungle for a brief "real world" tour of what a crafting room really looks like (LOL!).  Then we'll hop in Millie, my intrepid 2013 Honda Accord, for a trip -- maybe to Rice's Market, maybe to Eileen's old stomping grounds of Easton, PA (and my first-ever visit to Hobby Lobby).  Then back to the Jungle to freshen up for this evening's Technique Tuesday class.  


YES, Eileen will be teaching some techniques in embossing and die cuting -- a class I sorely need!  There are 15-20 crafters joining us at Frank's Pizza in Warminster (because everything goes better with food!) from 6-8 p.m.  We'll not only be taught by a master (that's Eileen!) but we'll also have a chance to tour her vintage trailer -- I assume one-by-one, LOL.


So stop back tomorrow for more on the techniques we're learning. And thank you, Eileen, for making this fun event happen here in the Paper Jungle!


DeFiaNtLy DiFfeReNt & CreAtiVeLy Yours,